DOOR BUDDY DOOR PROP
INSTALLATION GUIDE
DOOR BUDDY PRODUCTS ARE DESIGNED TO MAKE LIFE SIMPLER FOR YOU AND YOUR CAT.
The Door Buddy Door Prop was specifically designed to keep larger or stronger dogs out, with its solid plastic construction and no door movement when in the propped position. Additionally, it is fully portable making it a convenient solution for renters or for traveling.
The Door Buddy Door Prop is compatible with standard left or right swinging indoor doors. However, it is important to note that slight variances in door hardware installation or wear and tear may affect its installation. But, don't worry! There are simple tweaks that you can make to overcome these situations.
We have provided basic installation steps and a TROUBLESHOOTING FAQ section with helpful video tutorials below.
If you encounter any issues, our customer service team is here to assist you. You can reach out to them at cs@thedoorbuddy.com, and they will be more than happy to troubleshoot with you.
INSTALLATION STEPS
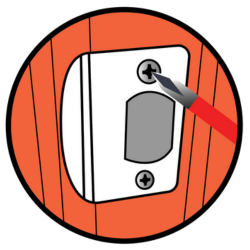
REMOVE
Unscrew and remove existing door strike plate from door jam
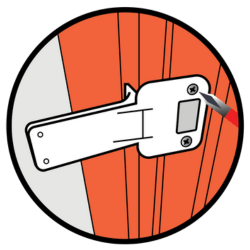
REPLACE
Install Door Buddy strike plate onto door jam using existing screws
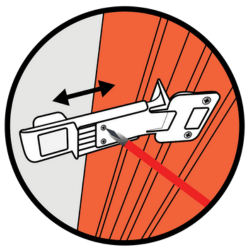
ADJUST
Set desired width and FULLY tighten screws until it is locked and no longer slides
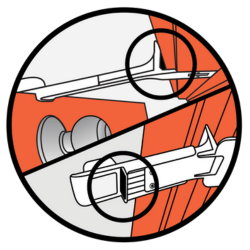
PROTECT
Add foam bumbers for a soft cushion when door latches onto door prop
TOP FEATURES
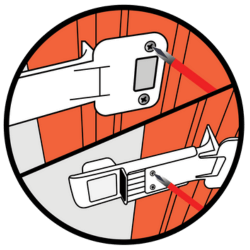
Simple, Zero Damage Installation & Removal
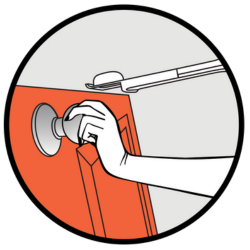
Convenient Access By Just Turning Knob
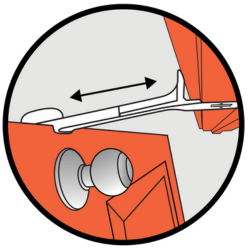
Adjust Width To Suit The Sizes Of Your Pets
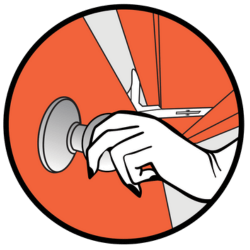
Door Fully Closable Without Uninstalling
COMPATIBILITY CHECK
The Door Buddy Door Prop is compatible with standard left and right swinging doors, as well as doors that push open into the room or pull open when entering. However, it's essential to consider various compatibility scenarios due to the wide range of hardware and molding types influenced by the age of the home, room layouts, and trim styles.
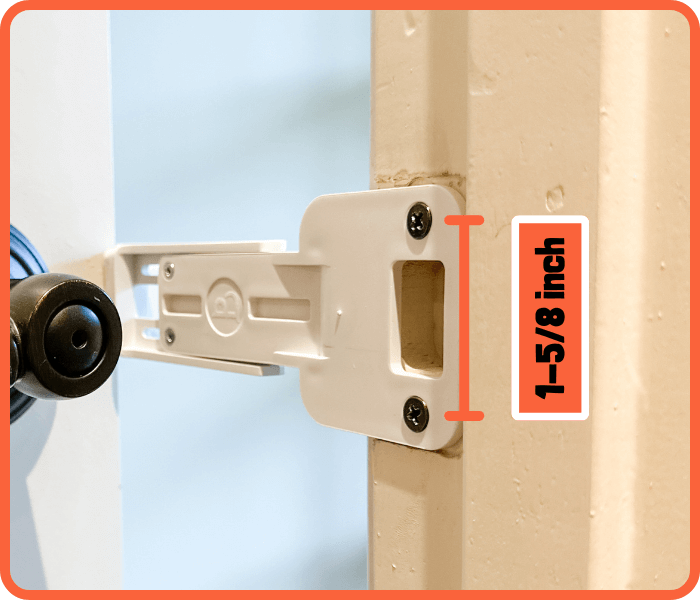
Strike Plate Size
The Door Buddy Door Prop is compatible with strike plates featuring screw holes that are precisely 1-5/8 inches apart. Currently, it is not designed to accommodate larger or smaller strike plates.
Please see FAQ 10 below for a possible workaround.
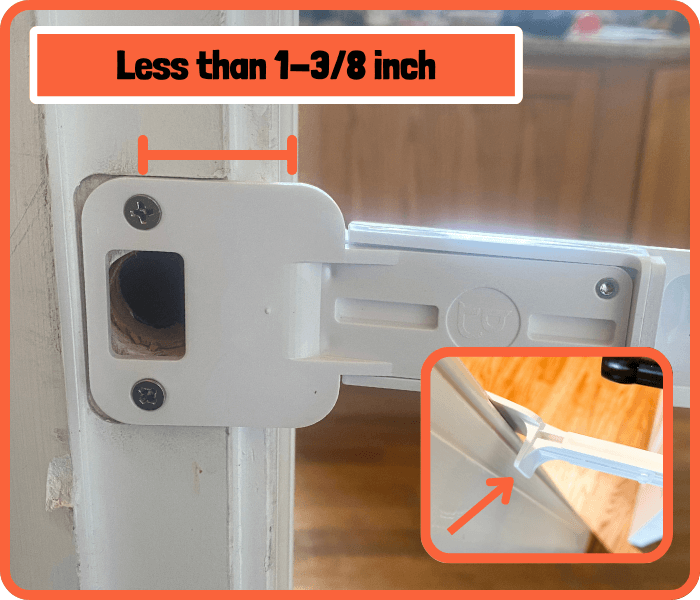
Depth to Front of Door Frame Trim
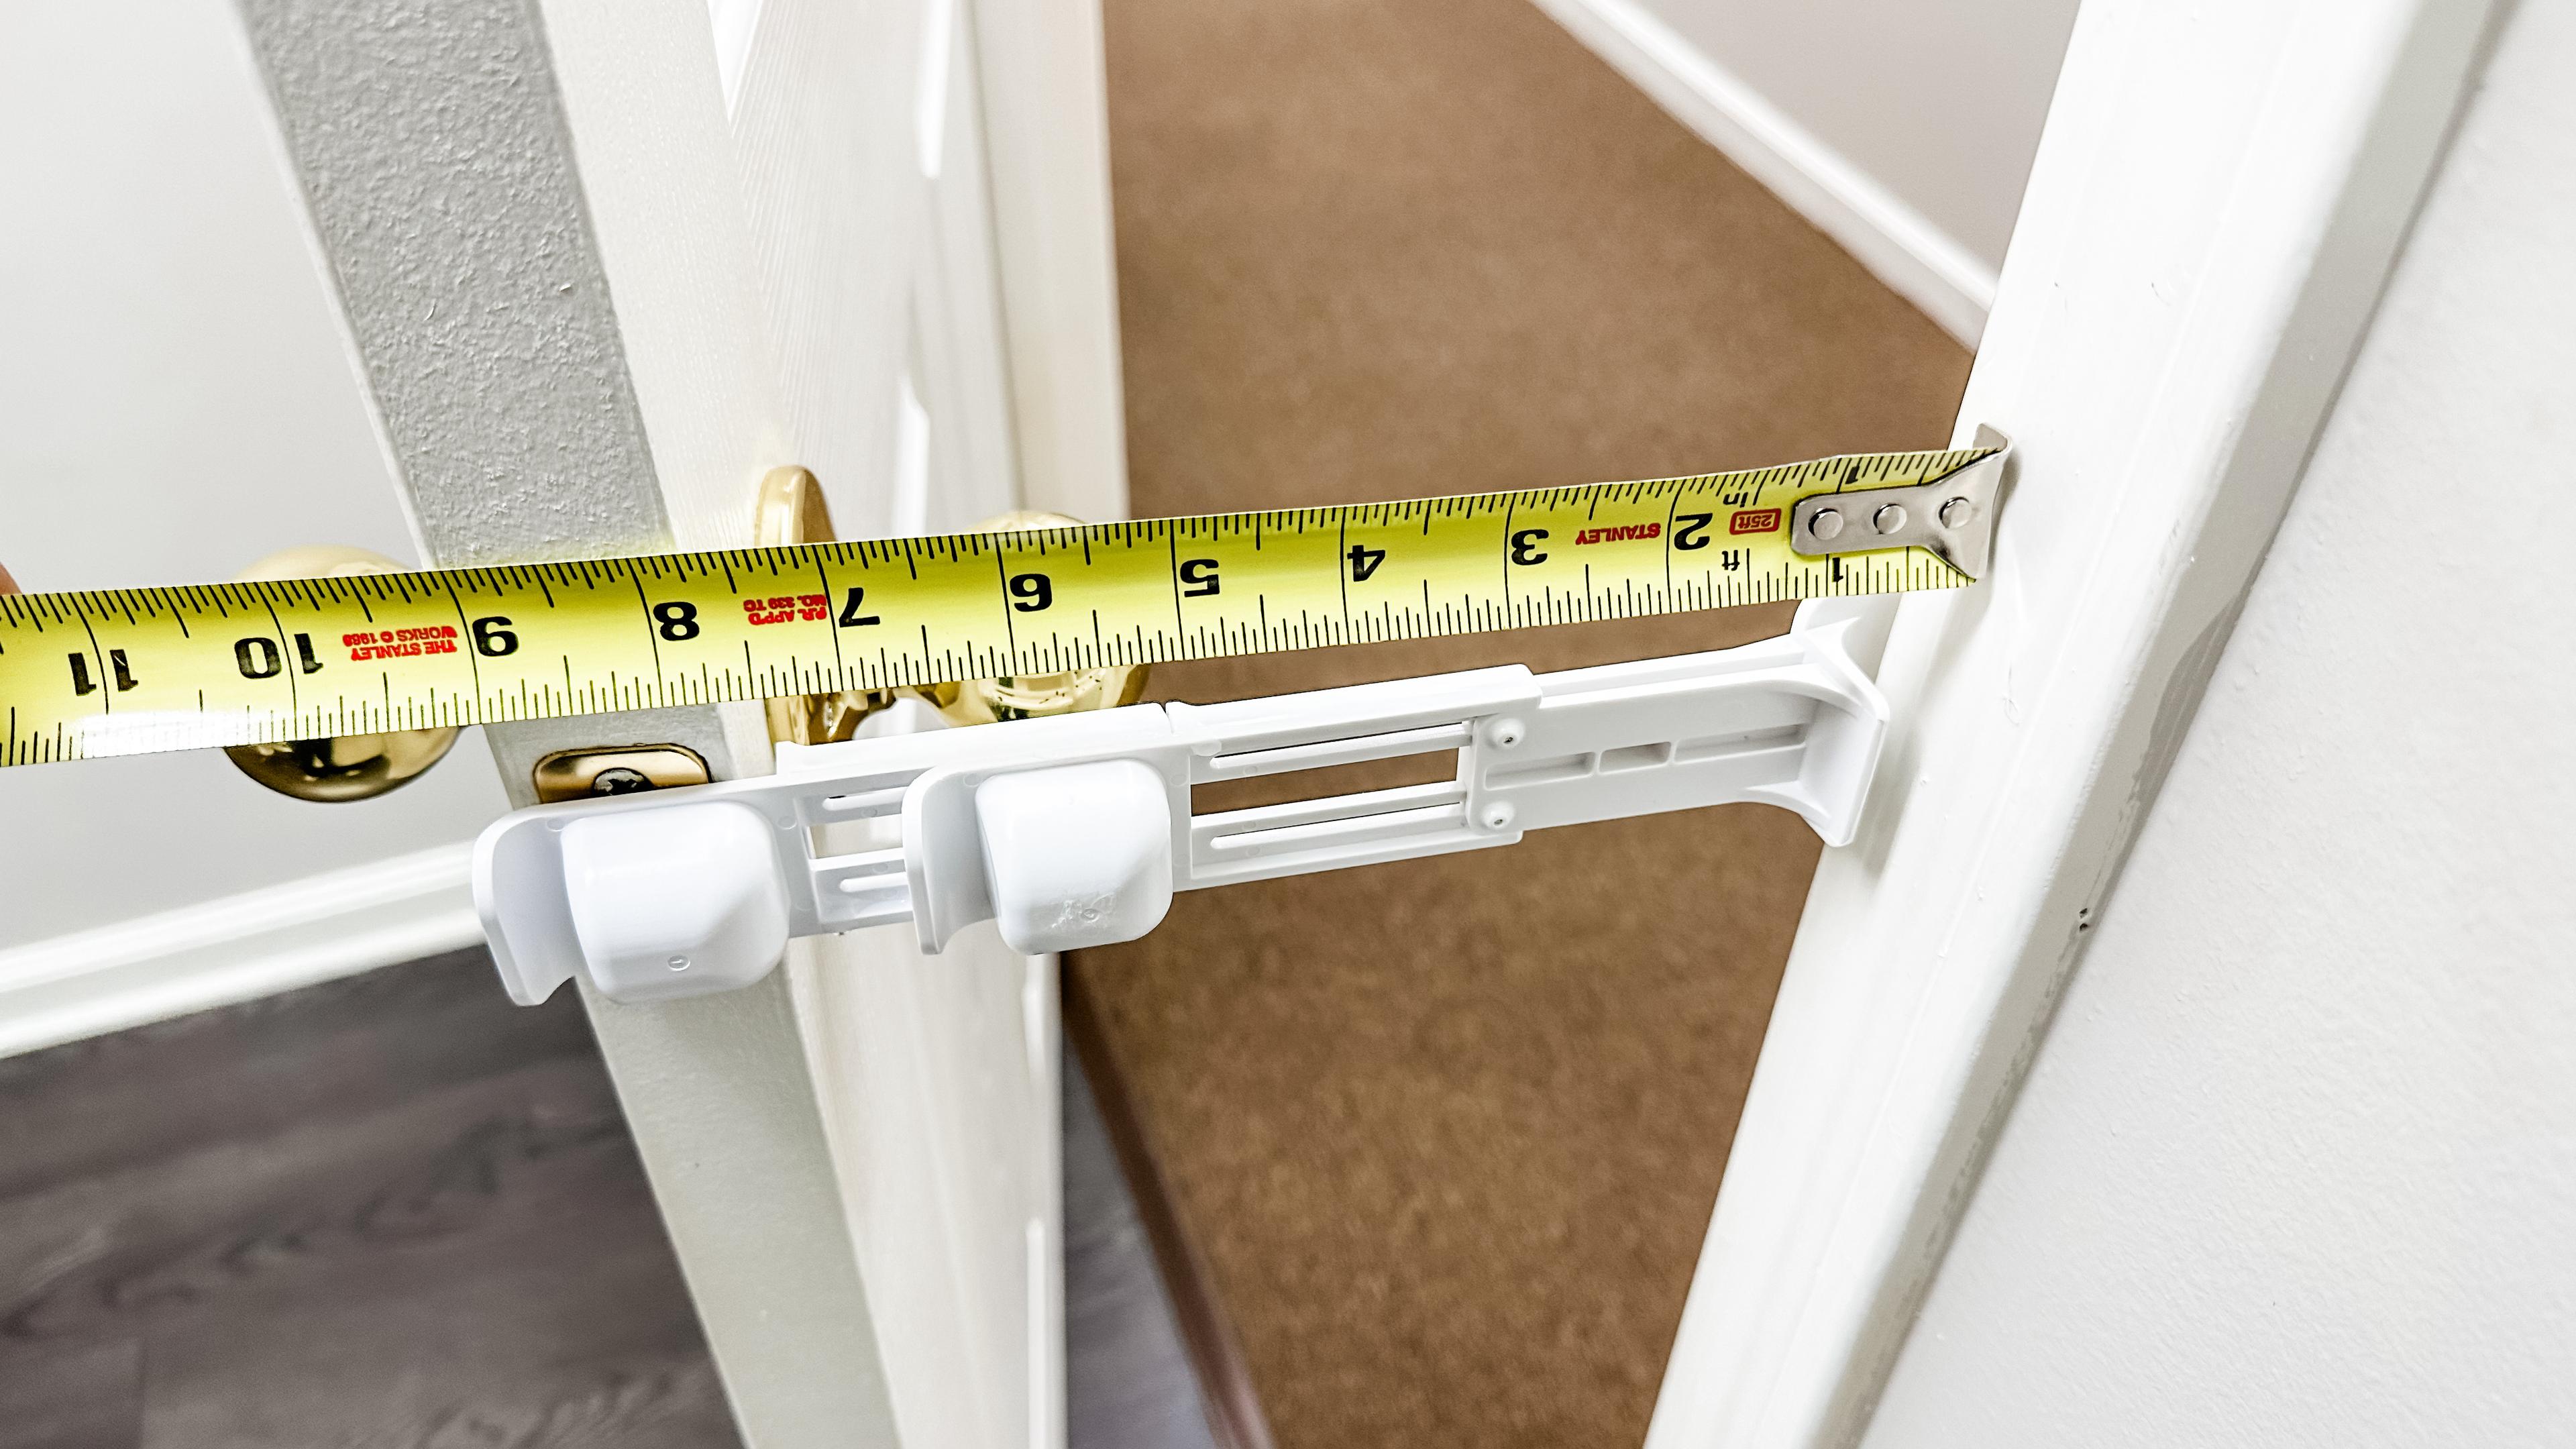
The Door Buddy Door Prop functions optimally when there is no extended door frame trim. To ensure proper installation, measure from the center of the screw hole to the front of the door frame trim. The depth should be less than 1-3/8 inches for seamless operation. Otherwise, the stopper on the strike plate part may obstruct the door or impede its closure.
Please see FAQ 8 below for a possible workaround.
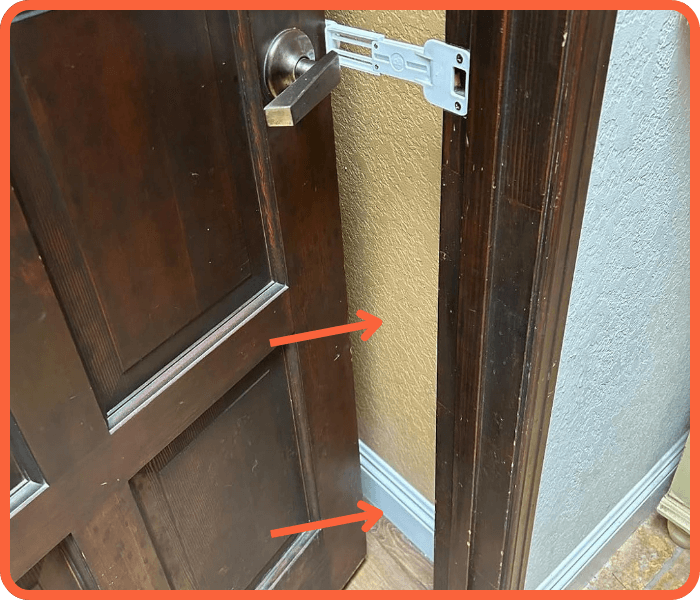
Narrow Opening Due to Wall/Cabinet/Appliance
The Door Buddy Door Prop offers adjustable settings, allowing you to create a gap between 3-5.5 inches when propping the doorway open. However, in cases where there is a wall, cabinet, or appliance directly adjacent to the doorway, the gap may be insufficient for your cat to pass through comfortably.
Please see FAQ 11 below for a possible workaround.
FAQs and Troubleshooting
To lock the door prop properly after adjusting it to your desired width, it is essential to FULLY tighten the small screws. If the door prop still slides, continue to tighten the screws just a bit more until the sliding stops. Sometimes even a quarter turn can make a significant difference, transforming it from unlocked (sliding) to locked (non-sliding).
All orders placed from September 2023 forward will include a T-8 Torx wrench specifically designed to help make tightening easier. Additionally, it might be easier to tighten the screws while holding the door prop rather than after it is installed on the door. You can refer to the video below for a visual demonstration of this process.
We strongly advise against using a power tool to tighten the small screws, as it could strip the screws and potentially damage the plastic threading that enables proper locking.
If, despite your best efforts, the door still slides open even after fully tightening the screws, please do not hesitate to contact our customer service at cs@thedoorbuddy.com. We are ready and eager to assist you. If your product is found to be defective, we will provide a free replacement.
If your Door Prop locks, but slowly slides over time, see FAQ 12 below.
The Door Buddy Door Prop is designed specifically for standard right or left swinging indoor doors. It is not suitable for doors without a standard strike plate and standard door latch hardware. This means that it will not work for doors with ball catch hardware, bifold, accordion, sliding, barn, or pocket doors. However, it can be used on some double doors as long as they have a standard strike plate and standard door latch.
For those with closet, bifold, accordion, barn, or pocket doors, we recommend the Door Buddy Door Strap. This alternative product is more customizable and works perfectly for these types of doors.
When installing the Door Buddy Door Prop, it is important to keep in mind that achieving a perfect fit immediately may not always be possible due to various factors such as age, wear and tear, and slight variations in installation. However, fear not, as there are simple adjustments that can be made to ensure a smooth operation.
One issue that may arise after installation is the latch holder being angled too far inside, which can prevent it from automatically latching when the door is closed. In such cases, it becomes necessary to manually push the latch holder to the outside in order to engage the door latch, which is not an optimal situation.
To address this, there are two options available:
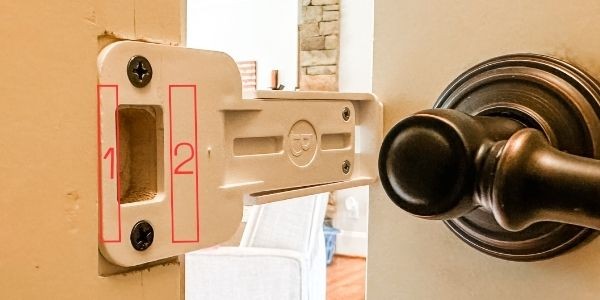
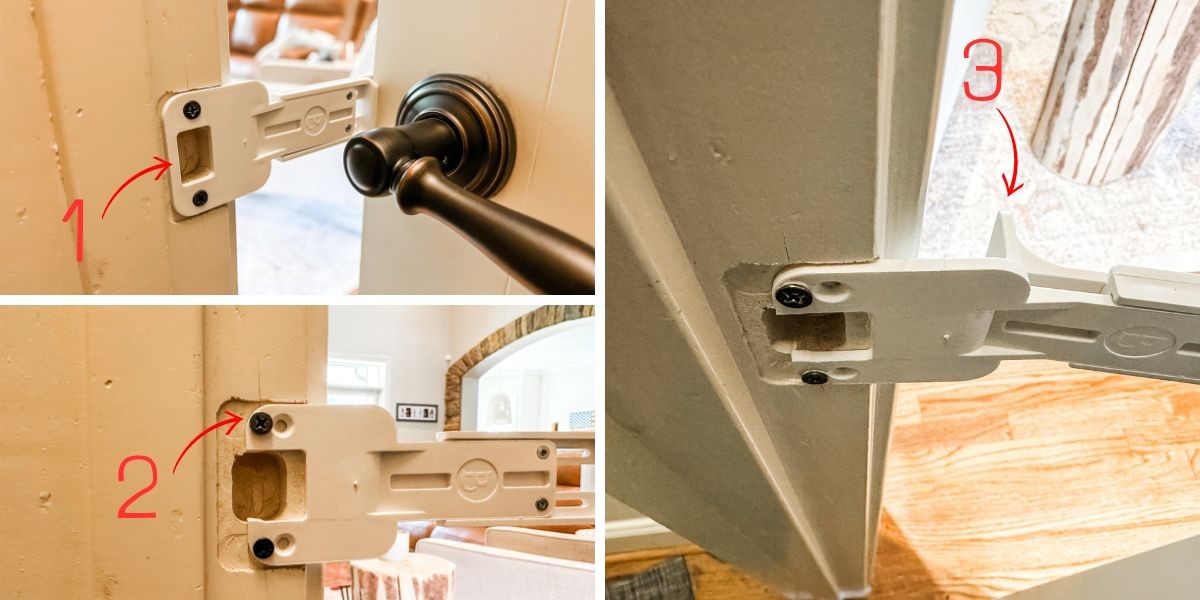
Option 1: Sand down the area behind the front part of the strike plate (#2). This adjustment aims to create a better alignment, allowing the latch holder to move freely and latch automatically without the need for manual assistance.
Option 2: Another approach is to place a folded piece of paper or cardstock behind the very back part of the strike plate (#1), between the part and the door frame. By experimenting with different thicknesses achieved through folding, you can find the perfect angle that ensures a tight fit and enables the latch holder to latch automatically when the door is pushed closed, without the need for any additional touch or manual intervention.
Remember, by making these small and simple adjustments, you can achieve the desired functionality and convenience with your Door Buddy Door Prop.
When installing the Door Buddy Door Prop, it is important to keep in mind that achieving a perfect fit immediately may not always be possible due to various factors such as age, wear and tear, and slight variations in installation. However, fear not, as there are simple adjustments that can be made to ensure a smooth operation.
During installation, it is important to ensure that the latch holder is positioned correctly. If the latch holder is angled too far outside, it may not be able to securely grab the door latch. This can result in the door being pulled or pushed open without the need to turn the door knob or handle, which is not an ideal situation. To avoid this, it is recommended to aim for a flush fit between the latch holder and the door. There should be no gap between the latch holder and the door when the latch is in the propped position. When the fit is tight and secure, the door can only be opened by turning the door handle or knob.
To address this, there are two options available:
Option 1: Ensure that the strike plate is screwed in tightly into the door jam. Make sure it is fully screwed in and secure. If this does not resolve the issue, move on to the second option.
Option 2: Take a folded piece of paper or cardstock and place it behind the front part of the strike plate (#2) between the part and the door frame. Start with a single fold and test the latch. If the latch still does not grab securely, continue folding the paper or cardstock to increase the thickness until you find the perfect angle for the proper tight fitting automatic latch.
By making these adjustments, you can ensure that the latch holder grabs the door latch securely without any gaps or looseness. This will help maintain the security of the door and prevent unwanted access without the use of the door handle or knob.

When installing the Door Buddy Door Prop, it is important to keep in mind that achieving a perfect fit immediately may not always be possible due to various factors such as age, wear and tear, and slight variations in installation. However, fear not, as there are simple adjustments that can be made to ensure a smooth operation.
After installation, it is important to ensure that the latch holder is properly positioned to prevent any issues with the door latch getting stuck. If the latch holder is angled too high or too low, it can cause the door latch to hit the top or bottom of the Door Buddy latch holder, allowing the door to be opened without using the door knob or handle. This is not an ideal situation, as the door latch should fit in the middle of the latch holder cavity.
To fix this issue, you can try one or both of the following options until the door latch fits properly:
Option 1: Start by loosening the small screws that secure the Door Buddy latch holder to the Door Buddy strike plate. Then, angle the latch holder up or down until the door latch fits in the middle of the latch holder cavity. Once the latch holder is in the correct position, retighten the small screws to lock it in place.
Option 2: Another option is to loosen the screws that secure the Door Buddy strike plate to the door frame. Adjust the angle of the whole Door Buddy Door Prop up or down until the door latch fits properly in the middle of the cavity. Once you have achieved the correct position, retighten the screws to securely fasten the Door Buddy strike plate to the door frame.
When the door latch fits properly in the middle of the latch holder cavity, the door can only be opened by turning the door handle or knob or manually pushing the Door Prop to the outside. This ensures the door remains securely propped and provides the desired level of safety.
Each Door Buddy Door Prop order includes 4 foam bumpers, which are essential for the proper installation and protection of your doors.
The first recommended placement for a bumper is on the ledge of the Door Buddy latch holder. This strategic placement ensures a soft cushioning effect, protecting the door from any potential damage caused by accidental slamming. In most cases, placing a single bumper here should suffice. However, if you notice excessive movement when the door is wiggled while propped, an additional bumper can be placed on top of the first one for added stability.
Another suitable location for a bumper is on the ledge of the Door Buddy strike plate, specifically on the side closest to the door frame. This placement is particularly important when the ledge comes into contact with the door frame upon closing. By using a bumper in this area, you can effectively prevent any scratching or damage that may occur.
Please note that it is not necessary to place bumpers directly on the actual door or door frame. Placing them on the plastic parts of the Door Buddy Door Prop should provide sufficient protection. For a visual demonstration of the recommended bumper placements, please refer to the video illustration below.
You will not find an easier product than this to use. Once it is properly installed, to enter the room, you'll simply turn the knob or handle like you do a normal door and the Door Buddy Door Latch Holder will release from the door latch allowing you to open the door freely from either side of the door without any hassles.
To relatch, simply push or pull the door towards the closed position until it relatches in the propped position.
To fully close the door, push the the Door Buddy Prop gently to the outside and then slide the door closed. To reopen the door after being closed, use one hand to push the prop gently to the outside and use the other hand to turn the door handle to retract the door latch into the door and push the door until fully open. It is that simple.
If it is hard to open and close the door please refer to compatibility section above and FAQ 8 below.
If you are experiencing difficulty in closing your door with the Door Prop installed caused by the strike plate ledge (#3) being too close to the door frame, preventing easy closure of the door with the Door Prop, you can try the following adjustment:
-
Use a utility knife or a small saw to cut off the back of the strike plate illustrated at #1 in the image below.
-
Next, drill two small holes evenly behind the existing ones. We recommend bit size 3/32.
-
Finally, install the Door Prop using the newly drilled holes. This should move the Door Prop forward enough, allowing you to easily push it to the outside and fully close the door.
We believe that these adjustments should resolve the issue you are facing. If the problem persists or if you have any further questions, please feel free to contact us at cs@thedoorbuddy.com.
To prevent your smart dog from pushing the Door Prop aside and unlatching the door, you can make a modification that will help secure it in place. Follow these steps: 1) Measure the width of the gap between the door prop and the front of the door frame. 2) Search for an item within your house that can fit into this gap without falling out. You can refer to the video tutorial for examples. 3) Carefully slide the chosen item into the gap and ensure that the Door Prop can no longer be pushed to the side to unlatch. By implementing this modification, you will still be able to enter and exit through the door easily by simply turning the knob or handle. To close the door securely, all you need to do is remove the object placed between the Door Prop and the door frame, push the Door Prop to the side, and close the door as usual.
To install your Door Buddy Door Prop when faced with a larger strike plate or misaligned screw holes, you have the option to use adhesives for securing the Door Buddy strike plate to your existing strike plate.
For best results, we recommend using the Door Buddy 3M Door Strap adhesives, known for their strong adhesive properties.
To begin, take a pair of scissors and carefully cut the adhesives to fit the bottom of the Door Buddy strike plate. Precision is key to ensure a secure fit.
Next, align the Door Buddy strike plate with your existing strike plate. It is crucial to align it properly to maintain the latch functionality to the door. To ensure a successful alignment, we suggest conducting a test to verify that it still latches.
Once you have achieved proper alignment, apply firm pressure to adhere the Door Buddy strike plate to the existing strike plate. This pressure will help establish a strong bond between the two plates.
After adhering, it is important to allow the adhesive time to cure. We recommend a minimum curing period of 24 hours to ensure maximum strength. During this time, it is advisable to avoid placing any pressure on the strike plate.
If there is a sufficient gap between the door and the door frame, the door should still be able to close even with the Door Buddy Door Prop installed using adhesive.
As an optional step, you may choose to follow FAQ 9 (as mentioned above) to place a stopper between the front of the door frame and the door prop. This can help reduce pressure on the adhesives and potentially provide added stability.
By following these instructions, you can successfully install your Door Buddy Door Prop using adhesives, even in situations where the strike plate is larger or the screw holes do not align.
If you have a wall, cabinet, or appliance directly next to the door, the door prop may not provide enough space for a cat to pass through, even on the widest width setting.
While we don't currently offer an official extension piece for the Door Prop, you can consider the following modification to potentially increase the gap to about 8 inches.
To make this modification, simply purchase an additional Door Buddy Door Prop Latch Holder piece from our website and use super glue to attach it to the end of the existing latch holder. Please note that while this modification may increase the gap size, it won't be as "secure" due to the extra length. Additionally, combining it with FAQ9 can make it a bit more sturdy.
Please refer to the image below for illustration.
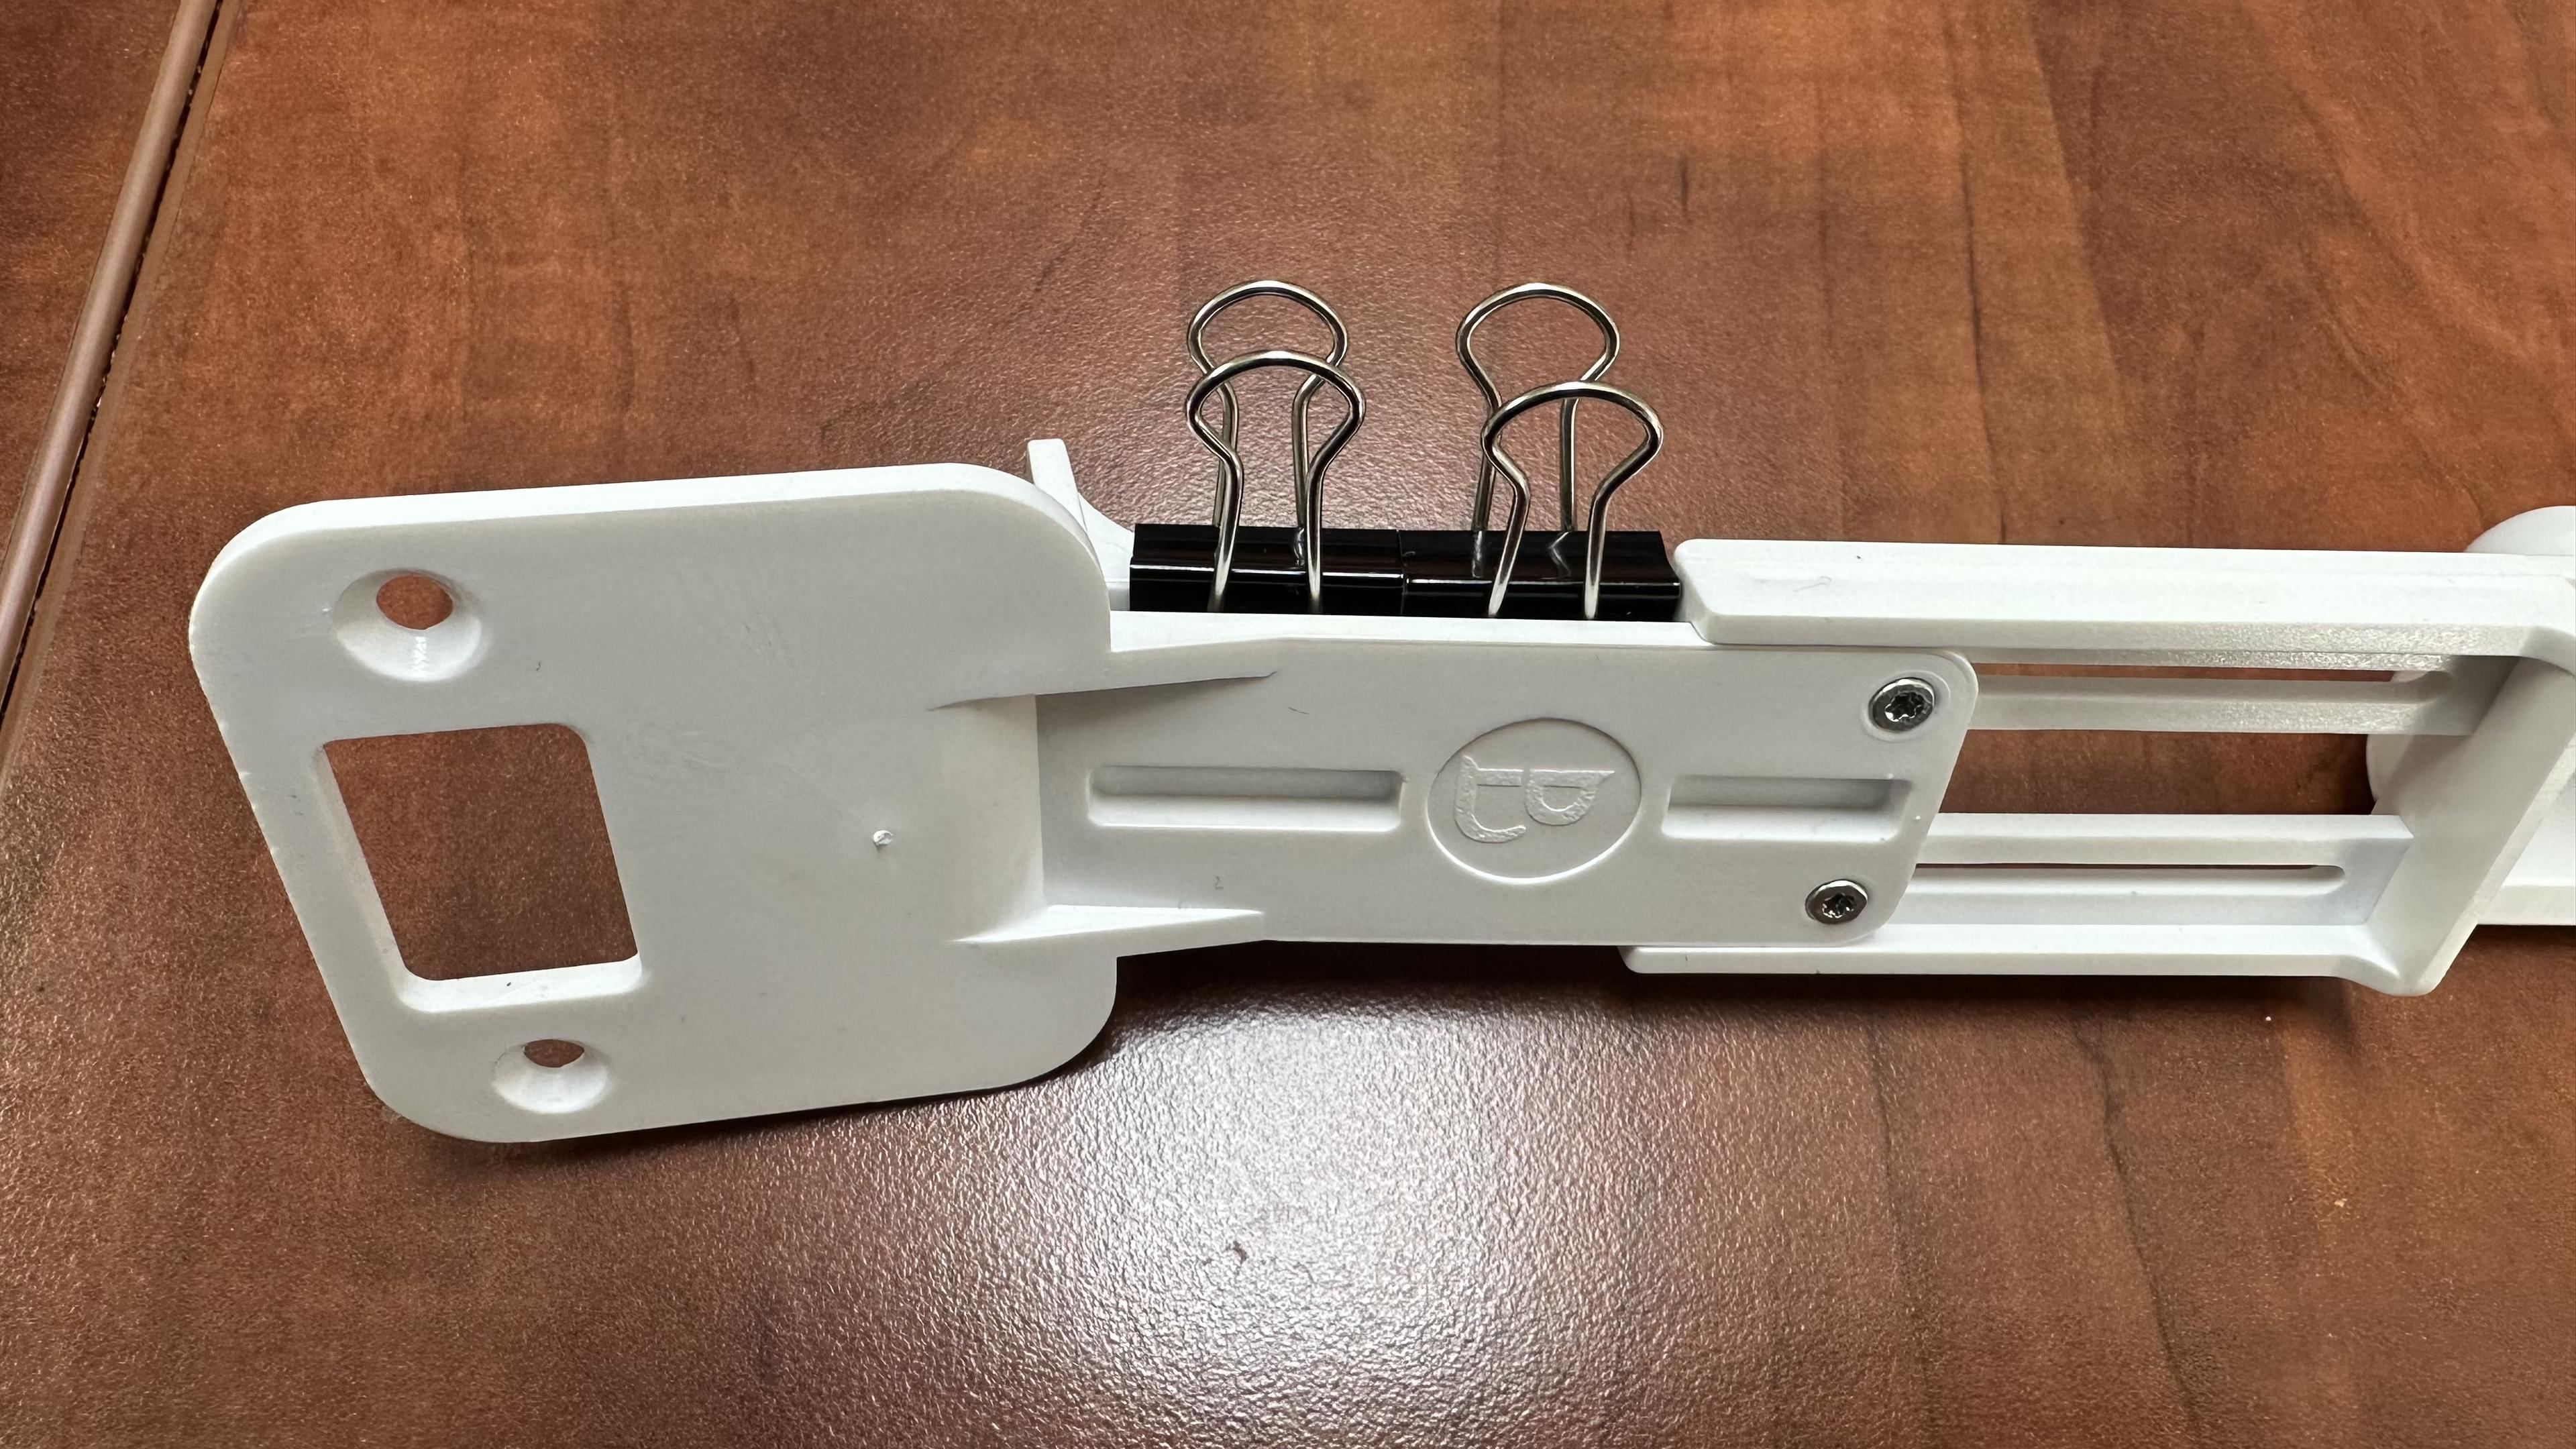
The Door Prop's adjustment relies on the screws to pull the two pieces together tightly enough to lock in place and prevent sliding.
However, continuous heavy use or even slamming may cause it to lose its setting over time. As a workaround, we've found that placing small binder clips into the grooves will prevent sliding that narrows the gap. See the image below for reference.
Alternatively, if you know you won't need to change the adjustment setting or to prevent sliding making the gap wider, using super glue to permanently set the adjustment is always an option.
The Door Buddy Door Prop will work perfectly for crawling babies or early stage toddlers.
It is important to note, however, that as children grow taller and develop the ability to reach and operate the door handle or knob, the Door Buddy may become less effective.
To prolong its usefulness, you can complement the Door Buddy Door Prop with additional safety measures such as a baby proof door knob cover or a child proof door lever lock. As an optional step, you may choose to follow FAQ 9 (as mentioned above) to place a stopper between the front of the door frame and the door prop. This can help prevent your little one from pushing the door prop to the side to unlock and provide added stability. This combination ensures that the door remains securely propped and inaccessible to curious little ones.
It is essential to remember that the Door Buddy is intended as a deterrent and should not replace proper adult supervision. While it can greatly assist in creating a safer environment for your baby and your cat, it is NOT a substitute for responsible caregiving.
Removal is just as simple and damage free as installing.
-
Simply unscrew and remove the Door Buddy Strike Plate Part.
-
Replace with the original door strike plate using same screws.
That is it. Easy Peasy.
The small crack in the plastic at the back of your Door Prop where the screws go in is not considered a defect.
We utilize self-threading screws to firmly secure the plastic parts and ensure that the Door Prop is locked into place. During the tightening process, it is possible for a small crack to form as a result of creating the threading. However, it is important to note that this crack is purely cosmetic in nature and should not impact the Door Prop's ability to lock at your desired door width setting.
In the event that the crack extends all the way through the plastic and causes the Door Prop to no longer lock properly, please do not hesitate to contact us. We will be more than happy to provide you with a free replacement to ensure that your Door Prop functions as intended.
We are pleased to inform you that your satisfaction is our top priority at Door Buddy. We have designed the Door Buddy Door Prop with the utmost care and confidence that it will meet your expectations. In order to provide you with peace of mind, we are offering a 60-day, hassle-free, money-back guarantee.
If, for any reason, you are not completely satisfied with your Door Buddy Door Prop, you can simply return it within the 60-day period. Upon receiving the returned item, we will credit back the full purchase price promptly.
At Door Buddy, our commitment goes beyond just offering a great product. We are dedicated to making your life easier. If you encounter any issues or challenges while using the Door Buddy Door Prop, our team is here to assist you. We are ready to troubleshoot any problems and provide personalized suggestions to improve its functionality in your specific situation.
We value clear communication and aim to address any concerns or inquiries you may have. You can always reach out to us for more information by contacting our customer support team. Additionally, you can find further details regarding our Shipping & Returns policy on our website.
Thank you for choosing Door Buddy. We are confident that our door prop will enhance your daily life and provide the convenience you deserve.
